 min read


How to Use a Propane-Powered Heat Tool for Heat Shrinking
Installation
Heat shrinking is an essential step in the packaging process for many equipment manufacturers — from marine to modular — where a secure, tight fit is crucial to protect equipment assets during over the road transit and storage. A propane-powered heat tool is ideal for this task, providing the necessary heat and control needed to efficiently heat shrink shrinkable packaging materials like shrink wrap or Transhield’s custom-fit covers made from The Shrinkable Fabric®.
Though heat shrinking is commonplace in many industries, it can be daunting for companies and individuals who are new to the utilization of heat tools. Transhield has utilized heat tools to shrink our custom-fit covers for 30 years, in that time we’ve observed some best practices that we would like to share, that will assist you in having a safer and more effective heat shrinking process.
What is a Heat Tool?
In this context, a heat tool, specifically a propane-powered one, is a tool that emits an extremely hot, concentrated flame. They are widely used for tasks that require controlled heat application, such as heat shrinking shrinkable packaging materials.
How to Use a Heat Tool for Heat Shrinking
Whether you are a novice heat shrinker or considering introducing heat tools into your packaging process or DIY project, these steps and best practices will help ensure the effective and safe use of propane-powered heat tools for the purposes of heat shrinking.
Step 1: Gather Necessary Materials
Before starting a heat shrinking operation, it’s important to have the necessary personal protective equipment (PPE) and equipment. Below are the recommended items to have on hand for a successful heat shrinking application:
- Propane-powered heat tool and hose: Transhield generally recommends SF Tools heat tools and accessories for their quality and built-in safety features. That said, these steps and principles can be applied to most heat shrinking tools.
- Propane tank: For propane-powered heat tools, it’s important that you use a vapor withdrawal propane tank, not a liquid withdrawal propane tank. Vapor withdrawal propane tanks are commonly used on barbeque style gas grills.
- Extension accessories: For large pieces of equipment, if possible, depending on the heat tool manufacturer, you should have extensions that allow you or your workers to safely shrink hard to reach areas.
- Heat-resistant gloves.
- Safety glasses or face shield.
- Fire extinguisher.
Step 2: Setting Up the Heat Tool
- Connect Heat Tool to Propane Tank: If your heat tool comes with a pressure regulator, first connect that to the propane tank. Then, connect your heat tool’s hose to the propane tank (or regulator), and lastly, the hose to the heat tool.
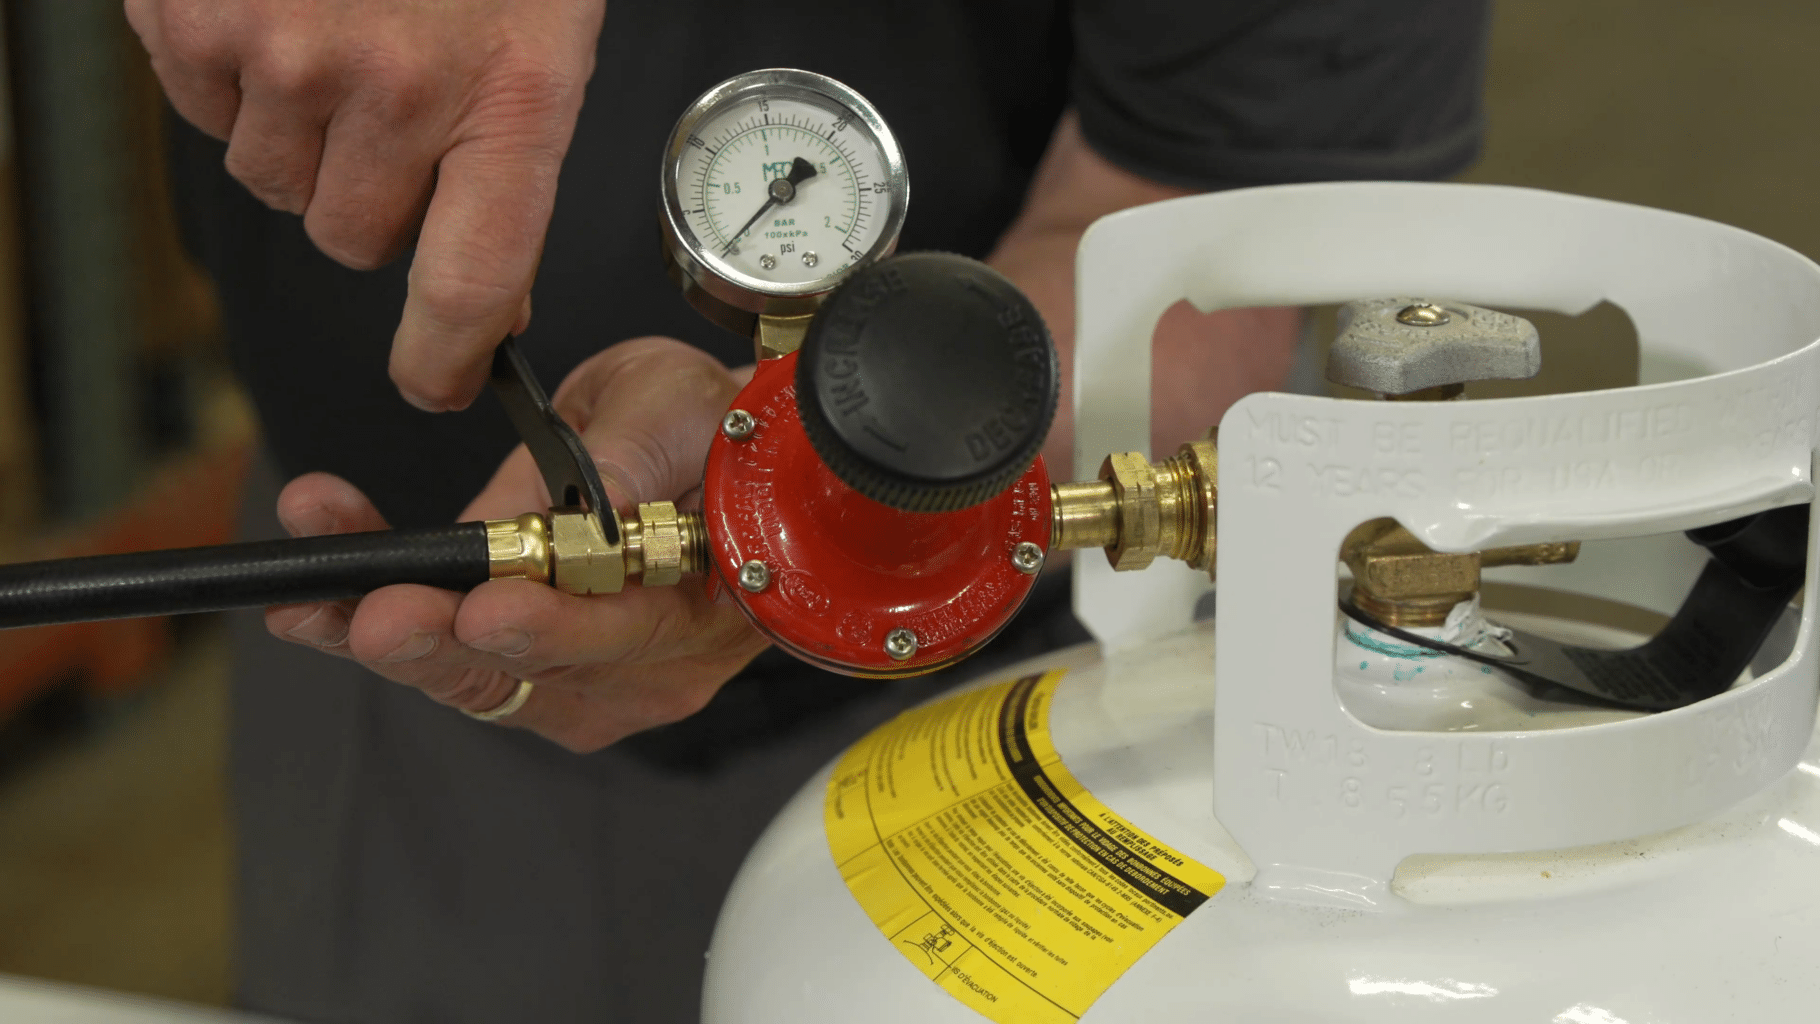
- Check for Gas Leaks: Before igniting your heat tool, turn on the propane tank and check all connections for leaks by spraying them with a soapy water solution. If air bubbles form on the connection seat, this is an indication of a gas leak and a sign that you need to tighten the connection. Re-tighten and re-test for leaks.
- Ignite the Tool: Test functionality by following the manufacturer’s instructions to ignite the heat tool.
Step 3: Heat Shrinking Best Practices
After you have successfully ignited your heat tool it is time to start heat shrinking your packaging material. The heat shrinking process can be intimidating the first time but will become less daunting with repetition and experience. A helpful analogy we use to simplify the concept of heat shrinking is comparing it to spray painting: you want to have a steady and consistent motion, not spraying one area for too long, so paint doesn’t run and is applied evenly. It’s the same concept with heat shrinking; you want a continuous and consistent motion, so that the heat does not build up on one area for too long, which will result in a burn through. Follow some of these other tips for a smooth heat shrinking process:
- Shrink at an Angle: When you approach the material with the ignited heat tool, do not use a 90-degree angle, rather, position yourself and the tool at a slight angle in relation to the work so that the heat is deflected away from you.
- Start with Perimeter: Shrink the entire bottom perimeter band of the cover or shrink wrap first. From there, go section by section working your way around the object in a consistent direction, going from top to bottom, shrinking as much of the material as you can safely reach.
- Don’t Shrink Moving Backwards: Never shrink moving backwards, always forward to avoid tripping on the hose or other objects in the workspace
- Maintain Proper Distance: Depending on the heat intensity, you’ll want to keep the flame of the heat tool at an appropriate distance from the material — usually 2-4 inches — to avoid burning or melting the material.
- Use Consistent Motion and Watch for Change in Material Properties: Don’t keep the flame of the heat tool on one area for more than a few seconds at a time. When the film properties begin to change from the applied heat – usually rippling out and then smoothening – you should move on from that area.
General Safety Tips
- Always wear heat-resistant gloves and safety glasses.
- Work in a well-ventilated area to avoid inhaling fumes.
- Keep a fire extinguisher nearby for emergencies.
- Follow the manufacturer’s instructions for the specific heat tool you are using.
- If available, mount your propane tank to some sort of mobile cart to eliminate the burden of constantly bending over to move it. This will also allow you to reduce slack in the hose, helping mitigate tripping hazards.
- Use heat tool extensions or ladders for hard-to-reach areas.
Conclusion
Propane powered heat tools are a fantastic asset to any packaging operation that utilizes shrink wrap or a shrinkable cover like Transhield. By following these steps, best practices, and safety precautions, you can ensure you and your team understand the basics of using a propane-powered heat tool for heat shrinking, ensuring a secure and professional finish on your packaging projects.
Learn More with Our Video Training
For visual learners, we have video training that details many techniques, troubleshooting tips, and applications covered in this article. Enhance your skills and ensure you are getting the most out of your heat tool by watching the full training session presented by President of SF Tools, Chuck Milliken: Watch Video Training Here.